One flat-head screwdriver,
A small knife with a thin blade,
A small cross-head screw driver
A soft but thick cloth, preferably something that won't matter if it gets damaged (this is to sit the iPod on when carrying out maintenance.
And a new iPod battery (3.7v, Li-ion, 1300mAh)
This is where I purchased my battery from - Sold here on eBay.
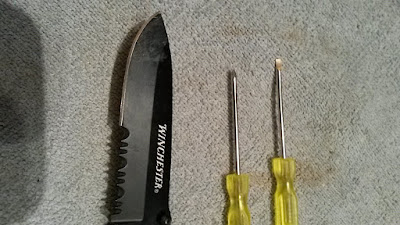 |
| (Fig.1) Ideal tools you'll need. |
| Battery with tools |
Ok first get your tools together (fig.1) Using the thin edge of the blade of the knife (please be super careful) against the thin line between the white casing and the shiny backing (Fig. 2)
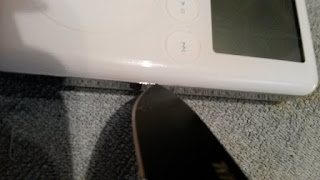 |
| (Fig. 2) |
Use a bit of force and some wiggling to ease the blade in-between the casings (Fig.2). Then gradually prise them apart. More wiggling may be necessary (Fig.3)
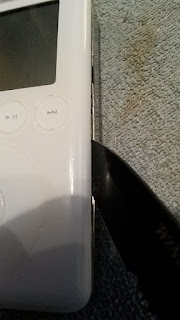 |
| (Fig. 3) (opening the case |
Using the flat-head screwdriver carefully prise apart the bottom and top of the case. This may take some time and patience.
The rear casing will then open up. (Fig. 4)
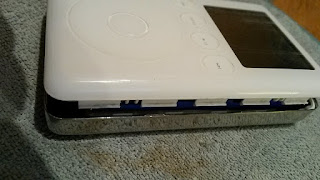 |
| (Fig. 4) Lifting the case |
NOTE:
Be super careful taking the case apart as there are some connectors still attached at the other end of the side you have opened. These connectors are for the headphone jack and hold switch. (Fig. 5)
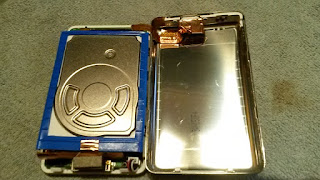 |
| (Fig. 5) Opening the case |
Once the case is open unplug the hard drive, by carefully lifting the unit away from the Logiboard. (Fig. 6), and set it aside.
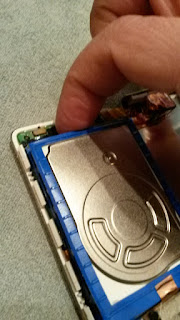 |
| (Fig. 6) Releasing the Hard Drive |
To prevent the headphone jack and hold switch cable from tearing, unplug from the Logiboard
Next lift out the battery. Now that you have taken out the screw, the wire connecting the battery to the connector will slide out easily. Then disconnect the connector to the Logiboard by gently pulling it out. (Fig. 8.1)
Then replace the battery. Doing the opposite in Fig. 8 and 8.1). Place the battery into the Logiboard, where the original sat. tuck the wire behind the corner of the Logiboard, Then insert connector. Next place in the screw.
Now plug the hard drive back into the Logiboard. (Fig. 9 and Fig. 9.1)
That's it. All done.
(Fig. 7). Using your fingers carefully pull on the connector to separate from the Logiboard.
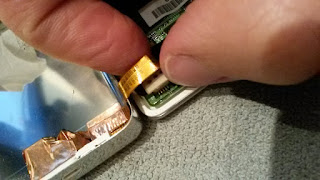 |
| (Fig. 7) Unplugging the cable of the headphone jack and hold switch |
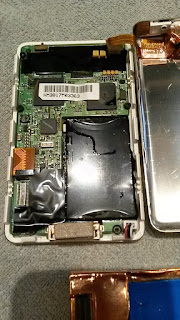 |
| The Logiboard, housing the battery (on the right) and the hard drive connector (on the left) |
Now where the battery sits, in the far right hand corner near the edge of the case you will see a small screw and a connector, just like the headphone jack and hold switch connector. You will need your cross-head screwdriver and take out the screw, set this aside. (Fig. 8).
 |
| (Fig. 8) Screw and battery connector |
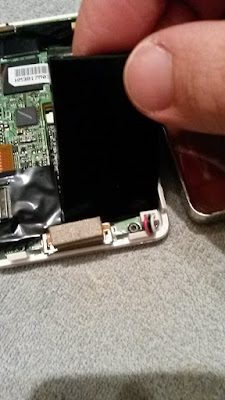 |
| (Fig. 8.1) Lift out the battery |
Then replace the battery. Doing the opposite in Fig. 8 and 8.1). Place the battery into the Logiboard, where the original sat. tuck the wire behind the corner of the Logiboard, Then insert connector. Next place in the screw.
Now plug the hard drive back into the Logiboard. (Fig. 9 and Fig. 9.1)
NOTE:
Be careful not to push or force the hard drive onto the Logiboard. By placing the hard drive over the Logiboard, lining up both connectors, you should be able to plug both in together easily. There may be a slight click when both connectors have connected. You will know when they have successfully connected as the hard drive will not move around freely.
 |
| (Fig. 9.1) Connector on Logiboard |
Next with the back cover, plug back in the headphone jack and hold switch cable..
Place the back cover over the the back of the front cover and applying equal pressure, push down firmly. This should snap in place. Pinch down all sides so the cases are flush together. (Fig. 10)
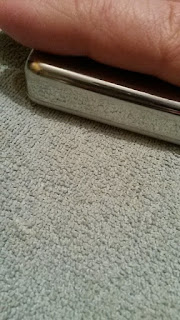 |
| (Fig. 10) Push down to snap both cases in place |
That's it. All done.
Additional:
Make sure to plug in your iPod and charge the battery before use. Your new battery may have some charge in it so power on the iPod to make sure it powers on ok. You will notice this by the Apple logo appearing on screen..
Any question please leave in the comments section.
Additional Additional
Just to warn you that you are following this tutorial at your own risk. I am NOT liable for any damages incurred when carrying out this maintenance by following my tutorial.
Additional Additional
Just to warn you that you are following this tutorial at your own risk. I am NOT liable for any damages incurred when carrying out this maintenance by following my tutorial.
Thank you for reading. CH

